# Automated Deployments
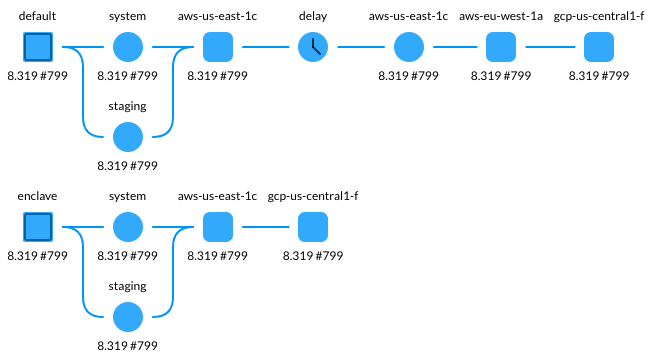
Vespa Cloud provides:
- A [CD test framework](#cd-tests) for safe deployments to production zones.
- [Multi-zone deployments](#deployment-orchestration) with orchestration and test steps.
This guide goes through details of an orchestrated deployment. Read / try [production deployment](production-deployment.html) first to have a baseline understanding. The [developer guide](../applications/developer-guide.html) is useful for writing tests. Use [example GitHub Actions](#automating-with-github-actions) for automation.
## CD tests
Before deployment in production zones, [system tests](#system-tests) and [staging tests](#staging-tests) are run. Tests are run in a dedicated and [downsized](environments.html) environment. These tests are optional, see details in the sections below. Status and logs of ongoing tests can be found in the _Deployment_ view in the [Vespa Cloud Console](https://console.vespa-cloud.com/):
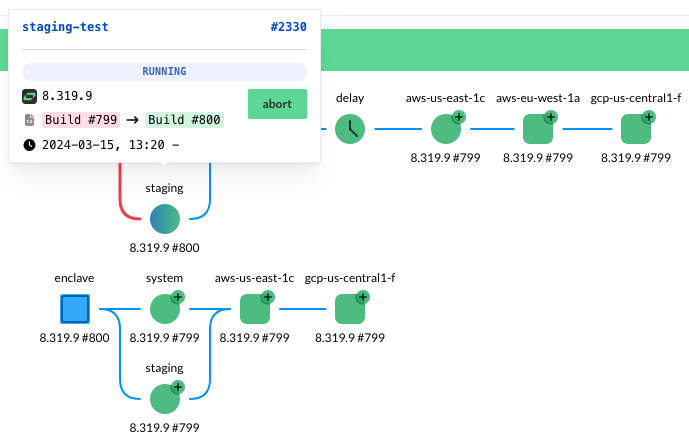
These tests are also run during [Vespa Cloud upgrades](#vespa-cloud-upgrades).
Find deployable example applications in [CI-CD](https://github.com/vespa-cloud/examples/tree/main/CI-CD).
### System tests
When a system test is run, the application is deployed in the [test environment](environments.html#test). The system test suite is then run against the endpoints of the test deployment. The test deployment is empty when the test execution begins. The application package and Vespa platform version is the same as that to be deployed to production.
A test suite includes at least one [system test](../applications/testing.html#system-tests). An application can be deployed to a production zone without system tests - this step will then only test that the application starts successfully. See [production deployment](production-deployment.html) for an example without tests.
Read more about [system tests](../applications/testing.html#system-tests).
### Staging tests
A staging test verifies the transition of a deployment of a new application package - i.e., from application package `Appold` to `Appnew`. A test suite includes at least one [staging setup](../applications/testing.html#staging-tests), and [staging test](../applications/testing.html#staging-tests).
1. All production zone deployments are polled for the current versions. As there can be multiple versions already being deployed (i.e. multiple `Appold`), there can be a series of staging test runs.
2. The application at revision `Appold` is deployed in the [staging environment](environments.html#staging).
3. The staging setup test code is run, typically making the cluster reasonably similar to a production cluster.
4. The test deployment is then upgraded to application revision `Appnew`.
5. Finally, the staging test code is run, to verify the deployment works as expected after the upgrade.
An application can be deployed to a production zone without staging tests - this step will then only test that the application starts successfully before and after the change. See [production deployment](production-deployment.html) for an example without tests.
Read more about [staging tests](../applications/testing.html#staging-tests).
### Disabling tests
To deploy without testing, remove the test files from the application package. Tests are always run, regardless of _deployment.xml_.
To temporarily deploy without testing, run `deploy` and hit the "Abort" button (see illustration above, hover over the test step in the Console) - this skips the test step and makes the orchestration progress to the next step.
### Running tests only
To run a system test, without deploying to any nodes after, add a new test instance. In _deployment.xml_, add the instance without `dev` or`prod` elements, like:
```
```
...
```
```
Note that this will leave an empty instance in the console, as the deployment is for testing only, so no resources deployed to after test.
Make sure to run `vespa prod deploy` to invoke the pipeline for testing, and use a separate application for this test.
## Deployment orchestration
The _deployment orchestration_ is flexible. One can configure dependencies between deployments to production zones, production verification tests, and configured delays; by ordering these in parallel and serial blocks of steps:
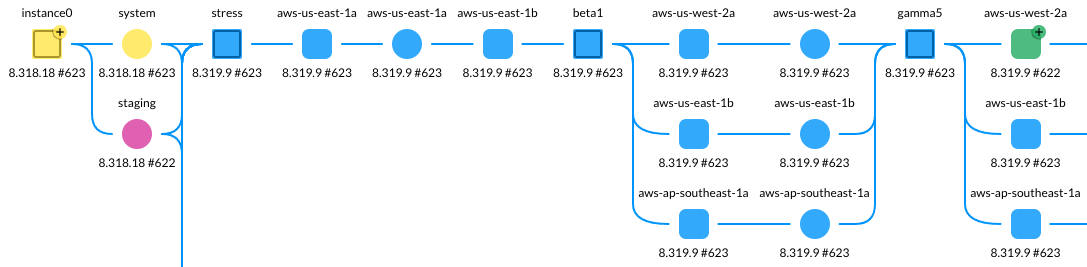
On a higher level, instances can also depend on each other in the same way. This makes it easy to configure a deployment process which gradually rolls out changes to increasingly larger subsets of production nodes, as confidence grows with successful production verification tests. Refer to [deployment.xml](../reference/deployment.html) for details.
Deployments run sequentially by default, but can be configured to [run in parallel](../reference/deployment.html). Inside each zone, Vespa Cloud orchestrates the deployment, such that the change is applied without disruption to read or write traffic against the application. A production deployment in a zone is complete when the new configuration is active on all nodes.
Most changes are instant, making this a quick process. If node restarts are needed, e.g., during platform upgrades, these will happen automatically and safely as part of the deployment. When this is necessary, deployments will take longer to complete.
System and staging tests, if present, must always be successfully run before the application package is deployed to production zones.
### Source code repository integration
Each new _submission_ is assigned an increasing build number, which can be used to track the roll-out of the new package to the instances and their zones. With the submission, add a source code repository reference for easy integration - this makes it easy to track changes:
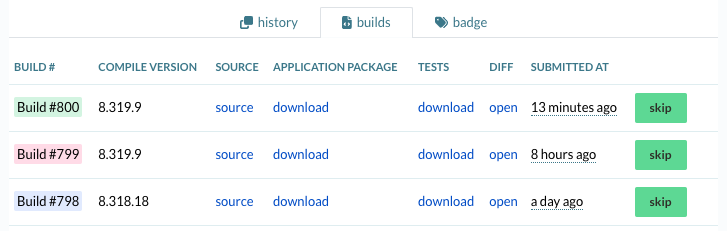
Add the source diff link to the pull request - see example [GitHub Action](https://github.com/vespa-cloud/vespa-documentation-search/blob/main/.github/workflows/deploy-vespa-documentation-search.yaml):
```
$ vespa prod deploy \
--source-url "$(git config --get remote.origin.url | sed 's+git@\(.*\):\(.*\)\.git+https://\1/\2+')/commit/$(git rev-parse HEAD)"
```
### Block-windows
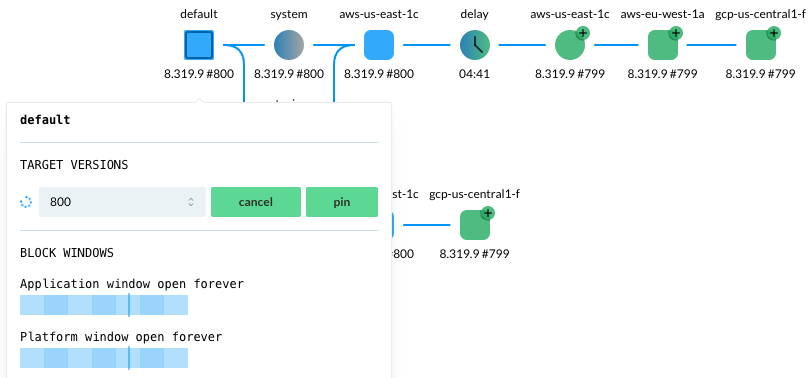
Use block-windows to block deployments during certain windows throughout the week, e.g., avoid rolling out changes during peak hours / during vacations. Hover over the instance (here "default") to find block status - see [block-change](../reference/deployment.html#block-change):
### Validation overrides
Some configuration changes are potentially destructive / change the application behavior - examples are removing fields and changing linguistic processing. These changes are disallowed by default, the deploy-command will fail. To override and force a deploy, use a [validation override](../reference/validation-overrides.html):
```
```
tensor-type-change
```
```
### Production tests
Production tests are optional and configured in [deployment.xml](../reference/deployment.html). Production tests do not have access to the Vespa endpoints, for security reasons. Dependent steps in the release pipeline will stop if the tests fail, but upgraded regions will remain on the version where the test failed. A production test is hence used to block deployments to subsequent zones and only makes sense in a multi-zone deployment.
### Deploying Components
Vespa is [backwards compatible](../learn/releases.html#versions) within major versions, and major versions rarely change. This means that [Components](../applications/components.html) compiled against an older version of Vespa APIs can always be run on the same major version. However, if the application package is compiled against a newer API version, and then deployed to an older runtime version in production, it might fail. See [vespa:compileVersion](production-deployment.html#production-deployment-with-components) for how to solve this.
## Automating with GitHub Actions
Auto-deploy production applications using GitHub Actions - examples:
- [deploy-vector-search.yaml](https://github.com/vespa-cloud/vector-search/blob/main/.github/workflows/deploy-vector-search.yaml) deploys an application to a production environment - a good example to start from!
- [deploy.yaml](https://github.com/vespa-cloud/examples/blob/main/.github/workflows/deploy.yaml) deploys an application with basic HTTP tests.
- [deploy-vespa-documentation-search.yaml](https://github.com/vespa-cloud/vespa-documentation-search/blob/main/.github/workflows/deploy-vespa-documentation-search.yaml) deploys an application with Java-tests.
The automation scripts use an API-KEY to deploy:
```
$ vespa auth api-key
```
This creates a key, or outputs:
```
Error: refusing to overwrite /Users/me/.vespa/mytenant.api-key.pem
Hint: Use -f to overwrite it
This is your public key:
-----BEGIN PUBLIC KEY-----
ABCDEwYHKoZIzj0CAQYIKoZIzj0DAQcDQgAEB2UFsh8ZjoWNtkrDhyuMyaZQe1ze
qLB9qquTKUDQTuM2LOr2dawUs02nfSc3UTfC08Lgr/dvnTnHpc0/fY+3Aw==
-----END PUBLIC KEY-----
Its fingerprint is:
12:34:56:78:65:30:77:90:30:ab:83:ee:a9:67:68:2c
To use this key in Vespa Cloud click 'Add custom key' at
https://console.vespa-cloud.com/tenant/mytenant/account/keys
and paste the entire public key including the BEGIN and END lines.
```
This means, if there is a key, it is not overwritten, it is safe to run. Make sure to add the deploy-key to the tenant using the Vespa Cloud Console.
After the deploy-key is added, everything is ready for deployment.
You can upload or create new Application keys in the console, and store them as a secret in the repository like the GitHub actions example above.
Some services like [Travis CI](https://travis-ci.com) do not accept multi-line values for Environment Variables in Settings. A workaround is to use the output of
```
$ openssl base64 -A -a < mykey.pem && echo
```
in a variable, say `VESPA_MYAPP_API_KEY`, in Travis Settings. `VESPA_MYAPP_API_KEY` is exported in the Travis environment, example output:
```
Setting environment variables from repository settings
$ export VESPA_MYAPP_API_KEY=[secure]
```
Then, before deploying to Vespa Cloud, regenerate the key value:
```
$ MY_API_KEY=`echo $VESPA_MYAPP_API_KEY | openssl base64 -A -a -d`
```
and use `${MY_API_KEY}` in the deploy command.
## Vespa Cloud upgrades
Vespa upgrades follows the same pattern as for new application revisions in [CD tests](#cd-tests), and can be tracked via its version number in the Vespa Cloud Console.
System tests are run the same way as for deploying a new application package.
A staging test verifies the upgrade from application package `Appold` to `Appnew`, and from Vespa platform version `Vold` to `Vnew`. The staging test then consists of the following steps:
1. All production zone deployments are polled for the current `Vold` / `Appold` versions. As there can be multiple versions already being deployed (i.e. multiple `Vold` / `Appold`), there can be a series of staging test runs.
2. The application at revision `Appold` is deployed on platform version `Vold`, to a zone in the [staging environment](environments.html#staging).
3. The _staging setup_ test code is run, typically making the cluster reasonably similar to a production cluster.
4. The test deployment is then upgraded to application revision `Appnew` and platform version `Vnew`.
5. Finally, the _staging test_ test code is run, to verify the deployment works as expected after the upgrade.
Note that one or both of the application revision and platform may be upgraded during the staging test, depending on what upgrade scenario the test is run to verify. These changes are usually kept separate, but in some cases is necessary to allow them to roll out together.
## Next steps
- Read more about [feature switches and bucket tests](../applications/testing.html#feature-switches-and-bucket-tests).
- A challenge with continuous deployment can be integration testing across multiple services: Another service depends on this Vespa application for its own integration testing. Use a separate [application instance](../reference/deployment.html#instance) for such integration testing.
- Set up a deployment badge - available from the console's deployment view - example: 
- Set up a [global query endpoint](../reference/deployment.html#endpoints-global).
Copyright © 2025 - [Cookie Preferences](#)
### On this page:
- [CD tests](#cd-tests)
- [System tests](#system-tests)
- [Staging tests](#staging-tests)
- [Disabling tests](#disabling-tests)
- [Running tests only](#running-tests-only)
- [Deployment orchestration](#deployment-orchestration)
- [Source code repository integration](#source-code-repository-integration)
- [Block-windows](#block-windows)
- [Validation overrides](#validation-overrides)
- [Production tests](#production-tests)
- [Deploying Components](#deploying-components)
- [Automating with GitHub Actions](#automating-with-github-actions)
- [Vespa Cloud upgrades](#vespa-cloud-upgrades)
- [Next steps](#next-steps)