-
Applications and components
- Developer guide
- IDE support
- Deployment
- .vespaignore files
- Containers
- Components
- Searchers
- Document processors
- Request handlers
- Result renderers
- Dependency injection
- Configuring components
- Chaining
- Inspecting structured data in a Searcher
- Developing web services
- Unit testing
- System testing
- The config system
- Request-response processing
- Bundles
- Using ZooKeeper
- Http servers and filters
- Using pluggable frameworks
- Java config API
-
Querying
- The query api
- The YQL query language
- Grouping and aggregation
- Federation
- Query profiles
- An intro to vector search
- Nearest neighbor search
- Approximate nearest neighbor search
- Nearest neighbor search guide
- Text matching
- Searching multivalue fields
- Geo search
- Document summaries
- Result diversity
- Page templates
-
Ranking and inference
- Ranking introduction
- Ranking expressions and features
- Multivalue query operators
- Tensor user guide
- Tensor examples
- Phased ranking
- Using TensorFlow models
- Using ONNX models
- Using XGBoost models
- Using LightGBM models
- Wand: Accelerated OR search
- The BM25 rank feature
- The nativeRank rank feature
- Cross-encoder transformer ranking
- Searcher re-ranking
- Significance model
- Stateless model evaluation
-
Linguistics and text processing
-
Content and elasticity
-
Performance
- Performance overview
- Practical performance guide
- Serving sizing guide
- Feed sizing guide
- Node resources
-
Instance types
- Topology and resizing
- Streaming search
- Benchmarking
- Benchmarking using Vespa Cloud
- Memory visualizer
- Profiling
- Container tuning
- Rate-limiting queries
- Graceful degradation
- Caches
- HTTP performance testing
- HTTP/2
- Feature tuning
- Valgrind
-
Operations
- Quota
- Environments
- Zones
- Availability Zones
- Production deployment
- Deployment variants
- Automated deployments
- Autoscaling
-
Enclave: Bring your own cloud
- Reindexing
- Reindexing on Vespa Cloud
- Data management and backup
- Cloning applications and data
- Monitoring
- Metrics
- Telemetry export
- Notifications
- Support
- Login Help
- Single Sign-On (SSO) Setup
- Deployment patterns
- Private endpoints
- Endpoint routing
- Access logging
-
Artifact archive
- Deleting applications
-
Self-managed
- Admin procedures
- Multinode Systems
- Files, Processes, Ports, Environment
- Node Setup
- Using Kubernetes
- Build and install
- Monitoring
- Content node recovery
- Configuration Servers
- Live Vespa upgrade procedure
- Config Sentinel
- Config Proxy
- Docker Containers
- Docker Containers GPU setup
- CPU Support
- Service Location Broker
- Change from attribute to index procedure
- Container
- Sizing examples
- Vespa Support CLI
-
Kubernetes
-
Modules
-
Reference
-
Applications and components
-
Schemas and documents
-
Reading and writing
-
Operations
- Health checks
- Log files
- Tools
-
Self-managed
-
Security
-
Release notes
The SPANN (Space Partitioned ANN) approach for approximate nearest neighbor search is described in SPANN: Highly-efficient Billion-scale Approximate Nearest Neighbor Search. SPANN uses a hybrid combination of graph and inverted index methods for approximate nearest neighbor search.
We recommend you read Billion-scale vector search using hybrid HNSW-IF for details on how SPANN is implemented using Vespa, before running this example application. Excerpt:
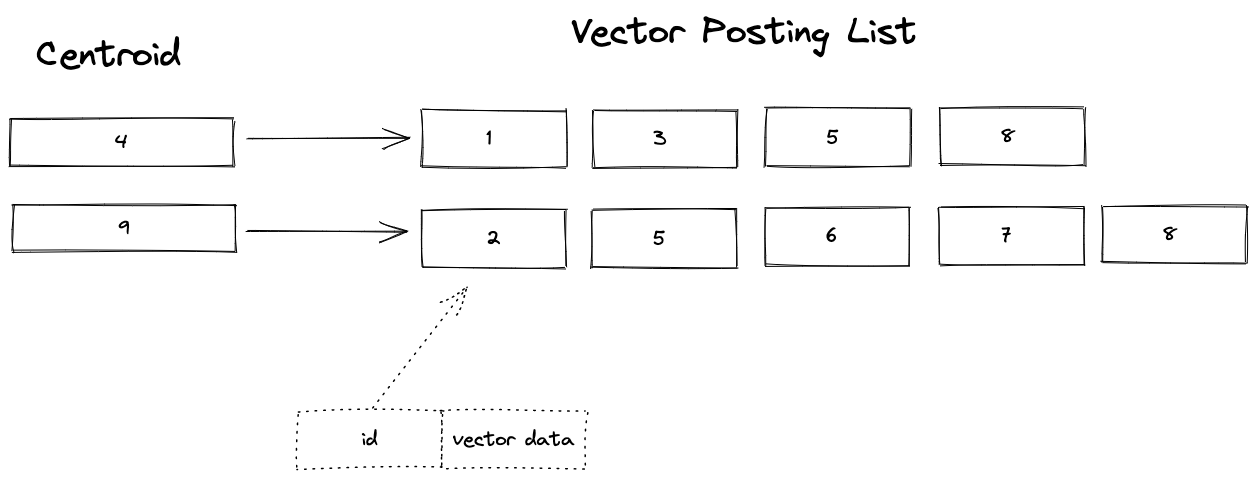
SPANN searches for the k closest centroid vectors of the query vector in the in-memory ANN search data structure. Then, it reads the k associated posting lists for the retrieved centroids and computes the distance between the query vector and the vector data read from the posting list:
This sample application demonstrates how to represent SPANN using Vespa.
Setup:
-
Create a tenant on Vespa Cloud:
Go to console.vespa-cloud.com and create your tenant (unless you already have one).
-
Install the Vespa CLI using Homebrew:
$ brew install vespa-cli
Windows/No Homebrew? See the Vespa CLI page to download directly.
-
Configure the Vespa client:
$ export VESPA_CLI_HOME=$PWD/.vespa
$ vespa config set target cloud
$ vespa config set application vespa-team.autotest
Use the tenant name from step 1 instead of "vespa-team", and replace in other steps in this example guide, too.
-
Get Vespa Cloud control plane access:
$ vespa auth login
Follow the instructions from the command to authenticate.
-
Clone a sample application:
$ vespa clone billion-scale-vector-search myapp && cd myapp
See sample-apps for other sample apps you can clone.
-
Add a certificate for data plane access to the application:
$ vespa auth cert app
It is a good idea to take note of the path to the
.pemfiles written here.
Download Vector Data
This sample app uses the Microsoft SPACEV vector dataset from big-ann-benchmarks.com. It uses the first 10M vectors of the 100M slice sample. This sample file is about 1GB (10M vectors):
$ curl -L -o spacev10m_base.i8bin \
  https://data.vespa-cloud.com/sample-apps-data/spacev10m_base.i8bin
Install dependencies and create the feed files for the first 10M vectors from the 100M sample:
$ pip3 install numpy requests tqdm
$ python3 app/src/main/python/create-vespa-feed.py spacev10m_base.i8bin
Output:
graph-vectors.jsonlif-vectors.jsonl
Build and deploy Vespa app
Build the application:
$ mvn clean package -U -f app
Deploy the application:
$ vespa deploy --wait 900 ./app
Wait for the application endpoint to become available:
$ vespa status --wait 300
Test basic functionality:
$ vespa test app/src/test/application/tests/system-test/feed-and-search-test.json
See CD tests for details.
Feed data
The graph vectors must be feed before the if vectors:
$ vespa feed graph-vectors.jsonl
$ vespa feed if-vectors.jsonl
Now is a good time to open the Vespa Cloud Dashboard to track progress.
Refer to <resources> configuration to manage the feeding speed - more CPU is better, e.g.:
<resources vcpu="8" memory="16Gb" disk="50Gb"/>
Use the instance type reference to find good combinations. Run time for a 2 VCPU deployment vs. 8 VCPU:


Observe the feed and query phases (below) of this guide:

Recall Evaluation
Download the query vectors and the ground truth for the 10M first vectors:
$ curl -L -o query.i8bin \
  https://github.com/microsoft/SPTAG/raw/main/datasets/SPACEV1B/query.bin
$ curl -L -o spacev10m_gt100.i8bin \
  https://data.vespa-cloud.com/sample-apps-data/spacev10m_gt100.i8bin
Find the path to the credentials from the vespa auth cert step above, like
/Users/username/.vespa/tenant_name.autotest.default/data-plane-public-cert.pem
Replace the two filenames in the command below. (This is not needed when running a local test)
Run first 1K queries and evaluate recall@10. A higher number of clusters gives higher recall:
$ ENDPOINT=$(vespa status --format=plain)
$ python3 app/src/main/python/recall.py \
  --endpoint ${ENDPOINT}/search/ \
  --query_file query.i8bin \
  --query_gt_file spacev10m_gt100.i8bin \
  --certificate $PWD/../.vespa/vespa-team.autotest.default/data-plane-public-cert.pem \
  --key         $PWD/../.vespa/vespa-team.autotest.default/data-plane-private-key.pem
See the blog post for details about this script.
$ vespa destroy --force
Local test with OCI image
Prerequisites:
-
Linux, macOS or Windows 10 Pro on x86_64 or arm64,
with Podman Desktop or
Docker Desktop installed, with an engine running.
-
Alternatively, start the Podman daemon:
$ podman machine init --memory 6000
$ podman machine start
- See Docker Containers for system limits and other settings.
-
Alternatively, start the Podman daemon:
- For CPUs older than Haswell (2013), see CPU Support.
- Memory: Minimum 4 GB RAM dedicated to Docker/Podman. Memory recommendations.
-
Disk: Avoid
NO_SPACE- the vespaengine/vespa container image + headroom for data requires disk space. Read more. - Homebrew to install the Vespa CLI, or download the Vespa CLI from Github releases.
- Java 17.
- Apache Maven is used to build the application.
Verify memory Limits:
$ docker info | grep "Total Memory"or
$ podman info | grep "memTotal"
Install Vespa CLI:
$ brew install vespa-cli
For local deployment:
$ vespa config set target local
Download this sample application:
$ vespa clone billion-scale-vector-search myapp && cd myapp
Pull and start the Vespa image:
$ docker pull vespaengine/vespa
$ docker run --detach --name vespa --hostname vespa-container \
  --publish 127.0.0.1:8080:8080 --publish 127.0.0.1:19071:19071 \
  vespaengine/vespa
Verify that the configuration service (deploy api) is ready:
$ vespa status deploy --wait 300
At this point, you can continue the guide from download vector data.
Cleanup
When done, remove the container:
$ docker rm -f vespa